

⼀:web架构介绍:
1.1:单机房架构:
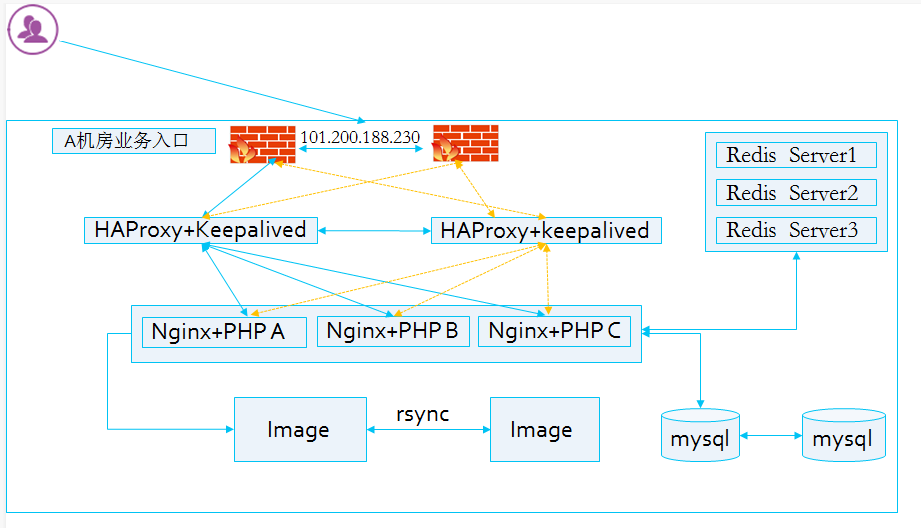
1.2:多机房架构:
1.3:公有云架构:
1.4:私有云架构:
⼆:负载均衡简介:
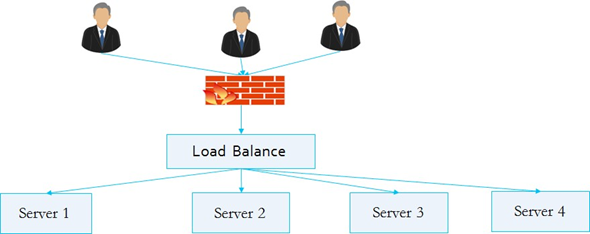
负载均衡(Load Balance,简称LB)是⼀种服务或基于硬件设备等实现的高可用反向代理技术,负载均衡将特定的业务(web服务、网络流量等)分担给指定的⼀个或多个后端特定的服务器或设备,从而提高了公司业务的并发处理能⼒、保证了业务的高可用性、方便了业务后期的⽔平动态扩展。
https://yq.aliyun.com/articles/1803 #阿里云SLB介绍
2.1:为什么使用负载均衡:
Web服务器的动态⽔平扩展-->对用户⽆感知
增加业务并发访问及处理能⼒-->解决单服务器瓶颈问题
节约公网IP地址-->降低IT⽀出成本
隐藏内部服务器IP-->提高内部服务器安全性
配置简单-->固定格式的配置文件
功能丰富-->⽀持四层和七层,支持动态下线主机
性能较强-->并发数万甚至数⼗万
2.2:负载均衡类型:
四层(传输层层):
LVS(Linux Virtual Server)-
HAProxy(High Availability Proxy)
Nginx(>=1.9)
七层:
HAProxy
Nginx
硬件:
F5 #https://f5.com/zh
Netscaler #https://www.citrix.com.cn/products/citrix-adc/
Array #https://www.arraynetworks.com.cn/
深信服 #http://www.sangfor.com.cn/
北京灵州 #http://www.lingzhou.com.cn/cpzx/llfzjh/
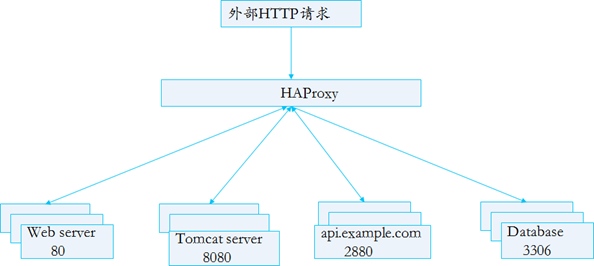
2.3:应用 场景:
四层:Redis、Mysql、RabbitMQ、Memcache等
七层:Nginx、Tomcat、Apache、PHP 、图⽚、动静分离、API等
2.4:HAProxy介绍:
HAProxy是法国开发者 威利塔罗(Willy Tarreau) 在2000年使⽤C语言开发的⼀个开源软件,是⼀款具备高并发(⼀万以上)、高性能的TCP和HTTP负载均衡器,支持基于cookie的持久性,自动故障切换,支持正则表达式及web状态统计,目前最新TLS版本为2.2
历史版本:
历史版本更新功能:1.4 1.5 1.6 1.7 1.8 1.9 2.0 2.1 2.2
2.3 2.4-dev
1.8:多线程,HTTP/2缓存……
1.7:服务器动态配置,多类型证书……
1.6:DNS解析支持,HTTP连接多路复用……
1.5:开始支持SSL,IPV6,会话保持……
从2013年HAProxy 分为社区版和企业版,企业版将提供更多的特性和功能以及全天24小时的技术支持等服务。
2.4.1:企业版:
2.4.2:社区版:
http://www.haproxy.org/ #社区版
https://github.com/haproxy #github
2.4.3:版本对⽐:
| 功能 | 社区版 | 企业版 |
|---|---|---|
| 高级HTTP / TCP负载平衡和持久性 | 支持 | 支持 |
| 高级健康检查 | 支持 | 支持 |
| 应用程序加速 | 支持 | 支持 |
| 高级安全特性 | 支持 | 支持 |
| 高级管理 | 支持 | 支持 |
| HAProxy Dev Branch新功能 | 支持 | |
| 24*7 支持服务 | 支持 | |
| 实时仪表盘 | 支持 | |
| VRRP和Route Health Injection HA⼯具 | 支持 | |
| ACL,映射和TLS票证密钥同步 | 支持 | |
| 基于应用程序的高级DDoS和Bot保护(自动保护) | 支持 | |
| Bot(机器⼈)监测 | 支持 | |
| Web应用防⽕墙 | 支持 | |
| HTTP协议验证 | 支持 | |
| 实时集群追踪 | 支持 |
2.4.4:HAProxy功能:
HAProxy功能:
	TCP和HTTP反向代理
	SSL/TSL服务器
	可以针对HTTP请求添加cookie,进行路由后端服务器
	可平衡负载至后端服务器,并支持持久连接
	支持所有主服务器故障切换至备用服务器
	支持专用端口实现监控服务
	支持不影响现有连接情况下停止接受新连接请求
	可以在双向添加,修改或删除HTTP报文首部
	响应报文压缩
	支持基于pattern实现连接请求的访问控制
	通过特定的URI为授权用户提供详细的状态信息

不具备的功能:
	正向代理--squid,nginx
	缓存代理--varnish
	web服务--nginx、tengine、apache、php、tomcat
	UDP--目前不支持UDP协议,2.1以后版本会支持UDP协议代理
	单机性能--小于LVS(DR)大于Nginx
三:HAProxy安装及基础配置
介绍HAProxy的基础安装及基础配置
IP地址划分:
掩码:
192.168.0.0/21

可用地址范围:
192.168.0.1-192.168.119.254
3.1:Ubuntu安装:
~# apt-get install software-properties-common
~# add-apt-repository ppa:vbernat/haproxy-2.0
~# apt update
~# apt-cache madison haproxy
~# apt install haproxy=2.0.4-1ppa1~bionic

#验证haproxy版本
# haproxy -v
HA-Proxy version 2.0.4-1ppa1~bionic 2019/08/09 - https://haproxy.org/
3.2:Centos 安装:
在centos 系统上通过yum、编译等多种安装方式。
3.2.1:默认yum源:
默认的base仓库中包含haproxy的安装包文件,但是版本⽐较旧,是1.5.18的版本,距离当前版本已经有较长时间没有更新,由于版本⽐较旧所以有很多功能不支持,如果对功能和性能没有要求可以使用此版本,否则推荐使用新版本
# yum install haproxy -y
#验证haproxy版本
# haproxy -v
HA-Proxy version 1.5.18 2016/05/10 Copyright 2000-2016 Willy Tarreau <willy@haproxy.org>
3.2.2:第三方安装包:
https://pkgs.org/download/haproxy #下载rpm包
#基于互联网在线安装
# wget http://www.nosuchhost.net/~cheese/fedora/packages/epel-7/x86_64/cheese-release-7-1.noarch.rpm
# rpm -ivh cheese-release-7-1.noarch.rpm
# yum install haproxy-1.8.14-1.el7.x86_64.rpm -y
#验证haproxy版本
# haproxy -v
HA-Proxy version 1.8.14-52e4d43 2018/09/20 Copyright 2000-2018 Willy Tarreau <willy@haproxy.org>
3.3:编译安装HAProxy:
编译安装HAProxy 2.0 LTS版本,更多源码包下载地址:http://www.haproxy.org/download/
3.3.1:解决lua环境:
HAProxy 支持基于lua实现功能扩展,lua是⼀种小巧的脚本语言,于1993年由巴西里约热内卢天主教大学(Pontifical Catholic University of Rio deJaneiro)里的⼀个研究小组开发,其设计目的是为了嵌入应用程序中,从而为应用程序提供灵活的扩展和定制功能。
Lua 应用场景
游戏开发
独立应用脚本
Web 应用脚本
扩展和数据库插件,如MySQL Proxy
安全系统,如入侵检测系统
3.3.1.1:Ubuntu 基础环境:
# apt install iproute2 ntpdate tcpdump telnet traceroute nfs-kernel-server nfs-common lrzsz tree openssl libssl-dev libpcre3 libpcre3-dev zlib1g-dev ntpdate tcpdump telnet traceroute gcc openssh-server lrzsz tree openssl libssl-dev libpcre3 libpcre3-dev zlib1g-dev ntpdate tcpdump telnet traceroute iotop unzip zip libreadline-dev libsystemd-dev #安装基础命令及编译依赖环境


# pwd
/usr/local/src
# wget http://www.lua.org/ftp/lua-5.3.5.tar.gz
# tar xvf lua-5.3.5.tar.gz
# cd lua-5.3.5
# make linux test
# pwd
/usr/local/src/lua-5.3.5
# ./src/lua -v
Lua 5.3.5 Copyright (C) 1994-2018 Lua.org, PUC-Rio
或安装系统自带的lua
# apt install lua5.3=5.3.3-1ubuntu0.18.04.1
# lua5.3 -v
Lua 5.3.3 Copyright (C) 1994-2016 Lua.org, PUC-Rio
3.3.1.2:Centos 基础环境:
由于centos⾃带的lua版本⽐较低并不符合HAProxy要求的lua最低版本(5.3)的要求,因此需要编译安装较新版本的lua环境,然后才能编译安装HAProxy,过程如下:
# yum install libtermcap-devel ncurses-devel libeventdevel readline-devel
# yum install gcc gcc-c++ glibc glibc-devel pcre pcre-devel openssl openssl-devel systemd-devel net-tools vim iotop bc zip unzip zlib-devel lrzsz tree screen lsof tcpdump
# 安装基础命令及编译依赖环境

# wget http://www.lua.org/ftp/lua-5.4.3.tar.gz
# tar xf lua-5.4.3.tar.gz
# cd lua-5.4.3
# make all test
# pwd
/usr/local/src/lua-5.4.3

# lua -v #当前系统版本
Lua 5.1.4 Copyright (C) 1994-2008 Lua.org, PUC-Rio

# ./src/lua -v #编译安装的版本
Lua 5.3.5 Copyright (C) 1994-2018 Lua.org, PUC-Rio
3.3.2:编译安装HAProxy:
# pwd
/usr/local/src
# tar xvf haproxy-2.0.4.tar.gz

#HAProxy 1.8及1.9版本编译参数:
make ARCH=x86_64 TARGET=linux2628 USE_PCRE=1 USE_OPENSSL=1 USE_ZLIB=1 USE_SYSTEMD=1 USE_CPU_AFFINITY=1 PREFIX=/usr/local/haproxy

#HAProxy 2.0编译参数:(下面编译参数编译haproxy-2.5.0版本有问题)
# make ARCH=x86_64 TARGET=linux-glibc USE_PCRE=1 USE_OPENSSL=1 USE_ZLIB=1 USE_SYSTEMD=1 USE_CPU_AFFINITY=1 USE_LUA=1 LUA_INC=/usr/local/src/lua-5.4.3/src/ LUA_LIB=/usr/local/src/lua-5.4.3/src/ PREFIX=/apps/haproxy
# make install PREFIX=/apps/haproxy
# cp haproxy /usr/sbin/
3.3.3:验证HAProxy版本:
#验证HAProxy版本:
# /apps/haproxy/sbin/haproxy -v
HA-Proxy version 2.0.4 2019/08/06 - https://haproxy.org/
3.3.4:HAProxy启动脚本:
# cat >> /usr/lib/systemd/system/haproxy.service << 'EOF'
[Unit]
Description=HAProxy Load Balancer
After=syslog.target network.target

[Service]
ExecStartPre=/usr/sbin/haproxy -f /etc/haproxy/haproxy.cfg -c -q
ExecStart=/usr/sbin/haproxy -Ws -f /etc/haproxy/haproxy.cfg -p /var/lib/haproxy/haproxy.pid
ExecReload=/bin/kill -USR2 $MAINPID

[Install]
WantedBy=multi-user.target
EOF
3.3.5:配置文件:
# mkdir /etc/haproxy
# cat /etc/haproxy/haproxy.cfg
global
maxconn 100000
chroot /apps/haproxy  # 这个设置任意目录,推荐haproxy的安装目录
stats socket /var/lib/haproxy/haproxy.sock mode 600 level admin
# stats socket /var/lib/haproxy/haproxy1.sock mode 600 level admin process 1 # 多进程模式下,需要每个进程定义一个socket文件
# stats socket /var/lib/haproxy/haproxy2.sock mode 600 level admin process 2
# stats socket /var/lib/haproxy/haproxy3.sock mode 600 level admin process 3
# stats socket /var/lib/haproxy/haproxy4.sock mode 600 level admin process 4
uid 99
gid 99
daemon
#nbproc 4
#cpu-map 1 0
#cpu-map 2 1
#cpu-map 3 2
#cpu-map 4 3
pidfile /var/lib/haproxy/haproxy.pid  # 目录需要手动创建
log 127.0.0.1 local3 info

defaults
option http-keep-alive
option forwardfor
maxconn 100000

mode http
timeout connect 300000ms
timeout client 300000ms
timeout server 300000ms

listen stats
	mode http
	bind 0.0.0.0:9999
	stats enable
	log global
	stats uri /haproxy-status
	stats auth haadmin:q1w2e3r4ys

listen web_port
	bind 192.168.119.101:80
	mode http
	log global
	server web1 127.0.0.1:8080 check inter 3000 fall 2 rise 5
3.3.6:启动haproxy:
# mkdir /var/lib/haproxy
# chown 99.99 /var/lib/haproxy/ -R
# systemctl start haproxy
# systemctl enable haproxy
# systemctl status haproxy
3.3.7:验证haproxy状态:
haproxy.cfg⽂件中定义了chroot、pidfile、user、group等参数,如果系统没有相应的资源会导致haproxy⽆法启动,具体参考日志文件/var/log/messages
3.4:基础配置详解:
HAPrpxy的配置文件haproxy.cfg由两大部分组成,分别是global和proxies部分。
global:全局配置段
进程及安全配置相关的参数
性能调整相关参数
Debug参数
proxies:代理配置段
defaults:为frontend, backend, listen提供默认配置

frontend:前端,相当于nginx中的server {}
backend:后端,相当于nginx中的upstream {}

listen:同时拥有前端和后端配置
3.4.1:global配置参数:
官方文档:https://cbonte.github.io/haproxy-dconv/2.0/intro.html
chroot #锁定运行目录
deamon #以守护进程运行
stats socket /var/lib/haproxy/haproxy.sock mode 600 level admin #socket⽂件
user, group, uid, gid #运⾏haproxy的用户⾝份
nbproc #开启的haproxy进程数,与CPU保持⼀致
nbthread #指定每个haproxy进程开启的线程数,默认为每个进程⼀个线程,开启多进程以后,就不能开启多线程了
cpu-map 1 0 #绑定haproxy 进程至指定CPU,单进程多线程和多进程单线程不能并存。
maxconn #每个haproxy进程的最大并发连接数
maxsslconn #每个haproxy进程ssl最大连接数,用于haproxy配置了证书的场景下
maxconnrate #每个进程每秒创建的最大连接数量
spread-checks #后端server状态check随机提前或延迟百分⽐时间,建议2-5(20%-50%)之间
pidfile #指定pid⽂件路径
log 127.0.0.1 local3 info #定义全局的syslog服务器;最多可以定义两个
3.4.2:Proxies配置:
https://cbonte.github.io/haproxy-dconv/2.0/configuration.html#4
defaults [<name>] #默认配置项,针对以下的frontend、backend和lsiten⽣效,可以多个name也可以没有name

frontend <name> #前端servername,类似于Nginx的⼀个虚拟主机server。
backend <name> #后端服务器组,等于nginx的upstream

listen <name> #将frontend和backend合并在⼀起配置
•注:name字段只能使用”-”、”_”、”.”、和”:”,并且严格区分大小写,例如:Web和web是完全不同的两组服务器。
3.4.2.1:Proxies配置-defaults:
defaults 配置参数:
option redispatch #当server Id对应的服务器挂掉后,强制定向到其他健康的服务器,重新派发
option abortonclose #当服务器负载很高的时候,自动结束掉当前队列处理⽐较久的链接,关闭
option http-keep-alive #开启与客户端的会话保持
option forwardfor #透传客户端真实IP至后端web服务器
mode http #设置默认工作类型
timeout http-keep-alive 120s #session 会话保持超时时间,范围内会转发到相同的后端服务器
timeout connect 10s #客户端请求从haproxy到后端server的最长连接等待时间(TCP之前),通常这个时间时间不会很长
timeout server 600s #客户端请求从haproxy到后端服务端的请求处理超时时长(TCP之后),这个时间设置要稍微长一点,
timeout client 600s #设置haproxy与客户端的最长非活动时间
timeout check 3s #对后端服务器的默认检测超时时间
3.4.2.2:Proxies配置-frontend:
frontend配置参数:
bind:指定HAProxy的监听地址,可以是IPV4或IPV6,可以同时监听多个IP或端口,可同时用于listen字段中
bind [<address>]:<port_range> [, ...] [param*]
listen http_proxy #监听http的多个IP的多个端口和sock文件
	bind :80,:443,:8801-8810
	bind 10.0.0.1:10080,10.0.0.1:10443
	bind /var/run/ssl-frontend.sock user root mode 600
accept-proxy


listen http_https_proxy #https监听
	bind :80
	bind :443 ssl crt /etc/haproxy/site.pem

listen http_https_proxy_explicit #监听ipv6、ipv4和unix sock文件
	bind ipv6@:80
	bind ipv4@public_ssl:443 ssl crt /etc/haproxy/site.pem
	bind unix@ssl-frontend.sock user root mode 600 acceptproxy

listen external_bind_app1 #监听file descriptor
	bind "fd@${FD_APP1}"


⽣产示例:
frontend WEB_PORT
	bind :80,:8080
	bind 192.168.119.102:10080,:8801-8810,192.168.119.101:9001-9010
	mode http/tcp #指定负载协议类型
	use_backend backend_name #调用的后端服务器组名称
3.4.2.3:Proxies配置-backend:
定义⼀组后端服务器,backend服务器将被frontend进行调用。
mode http/tcp #指定负载协议类型
option #配置选项
server #定义后端real server
注意:option后面加httpchk,smtpchk,mysql-check,pgsql-check,sslhello-chk方法,可用于实现更多应用层检测功能。
check #对指定real进行健康状态检查,默认不开启
	addr IP #可指定的健康状态监测IP
	port num #指定的健康状态监测端口
	inter num #健康状态检查间隔时间,默认2000 ms
	fall num #后端服务器失效检查次数,默认为3
	rise num #后端服务器从下线恢复检查次数,默认为2
weight #默认为1,最大值为256,0表示不参与负载均衡
backup #将后端服务器标记为备份状态
disabled #将后端服务器标记为不可用状态
redirect prefix http://www.12345.net/ #将请求临时重定向至其它URL,只适用于http模式
maxconn <maxconn>:当前后端server的最大并发连接数
backlog <backlog>:当server的连接数达到上限后的后援队列长度
3.4.2.4:frontend+backend配置实例:
#官网业务访问入口======================================
frontend WEB_PORT_80
	bind 192.168.119.248:80
	mode http
	use_backend web_prot_http_nodes

backend web_prot_http_nodes
	mode http
	option forwardfor
	server 192.168.119.101 192.168.119.101:8080 check inter 3000 fall 3 rise 5
	server 192.168.119.102 192.168.119.102:8080 check inter 3000 fall 3 rise 5
3.4.2.5:Proxies配置-listen替代frontend+backend:
使⽤listen替换frontend和backend的配置方式:
#官网业务访问入口=====================================
listen WEB_PORT_80
	bind 192.168.119.102:80
	mode http
	option forwardfor
	server web1 192.168.119.101:80 check inter 3000 fall 3 rise 5
	server web2 192.168.119.101:80 check inter 3000 fall 3 rise 5
四:HAProxy调度算法:
HAProxy通过固定参数balance指明对后端服务器的调度算法,该参数可以配置在listen或backend选项中。
HAProxy的调度算法分为静态和动态调度算法,但是有些算法可以根据参数在静态和动态算法中相互转换。
https://cbonte.github.io/haproxy-dconv/2.0/configuration.html#4 #官方文档
4.1:静态算法:
静态算法:按照事先定义好的规则轮询公平调度,不关⼼后端服务器的当前负载、链接数和响应速度等,且⽆法实时修改权重,只能靠重启HAProxy⽣效。
服务器动态权重调整:
# yum install socat
# Socat 是 Linux 下的⼀个多功能的网络工具,名字来由是Socket CAT,Socat 的主要特点就是在两个数据流之间建立通道,且支持众多协议和链接方式。如 IP、TCP、 UDP、IPv6、Socket⽂件等。

# echo "show info" | socat stdio
/var/lib/haproxy/haproxy.sock

# echo "get weight web_host/web1" | socat stdio /var/lib/haproxy/haproxy.sock
1 (initial 1)
# web_host是backend或者listen的名字web1是服务器名称

#echo "set weight web_host/web1 2" | socat stdio /var/lib/haproxy/haproxy.sock
Backend is using a static LB algorithm and only accepts weights '0%' and '100%'.
# 静态算法,不允许设置权重
4.1.1:static-rr:
static-rr:基于权重的轮询调度,不支持权重的运行时调整及后端服务器慢启动,其后端主机数量没有限制
listen web_host
	bind 192.168.119.101:80,:8801-8810,192.168.119.101:9001-9010
	mode http
	log global
	balance static-rr
	server web1 192.168.119.103:80 weight 1 check inter 3000 fall 2 rise 5
	server web2 192.168.119.104:80 weight 2 check inter 3000 fall 2 rise 5
测试访问效果
4.1.2:first:
first:根据服务器在列表中的位置,自上而下进行调度,但是其只会当第⼀台服务器的连接数达到上限,新请求才会分配给下⼀台服务,因此会忽略服务器的权重设置。
listen web_host
	bind 192.168.119.101:80,:8801-8810,192.168.119.101:9001-9010
	mode http
	log global
	balance first
	server web1 192.168.119.103:80 maxconn 2 weight 1 check inter 3000 fall 2 rise 5
	server web2 192.168.119.104:80 weight 1 check inter 3000 fall 2 rise 5
测试访问效果
# while true;do curl http://192.168.119.101/app/index.html; sleep 0.1;done
4.2:动态算法:
动态算法:基于后端服务器 状态进行调度适当调整,⽐如优先调度至当前负载较低的服务器,且权重可以在haproxy运行时动态调整⽆需重启。
4.2.1:roundrobin:
roundrobin:基于权重的轮询动态调度算法,支持权重的运行时调整,不完全等于lvs中的rr轮训模式,HAProxy中的roundrobin⽀持慢启动(新加的服务器会逐渐增加转发数),其每个后端backend中最多支持4095个real server,roundrobin为默认调度算法,且支持对real server权重动态调整。
listen web_host
	bind 192.168.119.101:80,:8801-8810,192.168.119.101:9001-9010
	mode http
	log global
	balance roundrobin
	server web1 192.168.119.103:80 weight 1 check inter 3000 fall 2 rise 5
	server web2 192.168.119.104:80 weight 2 check inter 3000 fall 2 rise 5
动态调整权限:
# echo "get weight web_host/web1" | socat stdio /var/lib/haproxy/haproxy.sock
1 (initial 1)

# echo "set weight web_host/web1 3" | socat stdio /var/lib/haproxy/haproxy.sock

# echo "get weight web_host/web1" | socat stdio /var/lib/haproxy/haproxy.sock
3 (initial 1)
4.2.2:leastconn
leastconn加权的最少连接的动态,支持权重的运行时调整和慢启动,即当前后端服务器连接最少的优先调度(新客户端连接),⽐较适合长连接的场景使用,⽐如MySQL等场景。
listen web_host
	bind 192.168.119.101:80,:8801-8810,192.168.119.101:9001-9010
	mode http
	log global
	balance leastconn
	server web1 192.168.119.103:80 weight 1 check inter 3000 fall 2 rise 5
	server web2 192.168.119.104:80 weight 1 check inter 3000 fall 2 rise 5
4.3:其他算法:
其他部分算法即可作为静态算法,⼜可以通过选项成为动态算法
4.3.1:source:
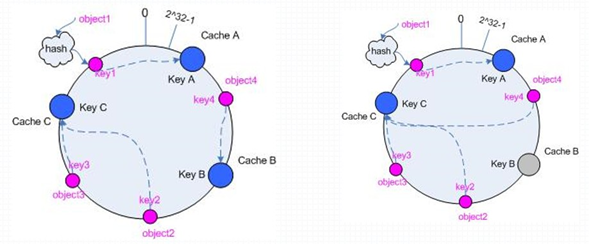
源地址hash,基于用户源地址hash并将请求转发到后端服务器,默认为静态即取模方式,但是可以通过hash-type⽀持的选项更改,后续同⼀个源地址请求将被转发至同⼀个后端web服务器,⽐较适用于session保持/缓存业务等场景。
源地址有两种转发客户端请求到后端服务器的服务器选取计算方式,分别是取模法和⼀致性hash
4.3.1.1:map-base取模法:
map-based:取模法,基于服务器总权重的hash数组取模,该hash是静态的即不支持在线调整权重,不支持慢启动,其对后端服务器调度均衡,缺点是当服务器的总权重发⽣变化时,即有服务器上线或下线,都会因权重发⽣变化而导致调度结果整体改变。

所谓取模运算,就是计算两个数相除之后的余数,10%7=3, 7%4=3,基于权重取模:(2^32-1)%(1+1+2),公式为,hash(o)mod n,即a mod b=c,表明a除以b余数为c。
4.3.1.1.1:取模法示意图:

4.3.1.1.2:取模法配置示例:
listen web_host
	bind 192.168.119.101:80,:8801-8810,192.168.119.101:9001-9010
	mode tcp
	log global
	balance source
	server web1 192.168.119.103:80 weight 1 check inter 3000 fall 2 rise 5
	server web2 192.168.119.104:80 weight 1 check inter 3000 fall 2 rise 5
4.3.1.2:⼀致性hash:
⼀致性哈希,该hash是动态的,支持在线调整权重,支持慢启动,优点在于当服务器的总权重发⽣变化时,对调度结果影响是局部的,不会引起大的变动。
4.3.1.2.1:hash对象:
Hash对象到后端服务器的映射关系:
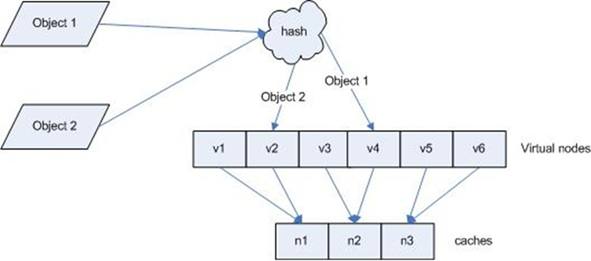
4.3.1.2.2:⼀致性hash示意图:
后端服务器在线与离线的调度方式
4.3.1.2.3:⼀致性hash配置示例:
listen web_host
	bind 192.168.119.101:80,:8801-8810,192.168.119.101:9001-9010
	mode tcp
	log global
	balance source
	hash-type consistent
	server web1 192.168.119.103:80 weight 1 check inter 3000 fall 2 rise 5
	server web2 192.168.119.104:80 weight 1 check inter 3000 fall 2 rise 5
4.3.2:uri:
基于对用户请求的uri做hash并将请求转发到后端指定服务器,也可以通过map-based和consistent定义使用取模法还是⼀致性hash。
http://example.org/absolute/URI/with/absolute/path/to/resource.txt #URI/URL
ftp://example.org/resource.txt #URI/URL
/relative/URI/with/absolute/path/to/resource.txt #URI

4.3.2.1:uri 取模法配置示例:
listen web_host
	bind 192.168.119.101:80,:8801-8810,192.168.119.101:9001-9010
	mode http
	log global
	balance uri
	server web1 192.168.119.103:80 weight 1 check inter 3000 fall 2 rise 5
	server web2 192.168.119.104:80 weight 1 check inter 3000 fall 2 rise 5
4.3.2.2:uri ⼀致性hash配置示例:
listen web_host
	bind 192.168.119.101:80,:8801-8810,192.168.119.101:9001-9010
	mode http
	log global
	balance uri
	hash-type consistent
	server web1 192.168.119.103:80 weight 1 check inter 3000 fall 2 rise 5
	server web2 192.168.119.104:80 weight 1 check inter 3000 fall 2 rise 5
4.3.2.3:访问测试:
访问不同的uri,确认可以将用户同样的请求转发至相同的服务器
# curl http://192.168.119.101/app/index.html
# curl http://192.168.119.101/app/index1.html
4.3.3:url_param:
url_param对用户请求的url中的 params 部分中的参数name作hash计算,并由服务器总权重相除以后派发至某挑出的服务器;通常用于追踪用户,以确保来自同⼀个用户的请求始终发往同⼀个real server
假设url = http://www.12345.com/foo/bar/index.php?k1=v1&k2=v2

则:
host = "www.12345.com"
url_param = "k1=v1&k2=v2"
4.3.3.1:url_param取模法配置示例:
listen web_host
	bind 192.168.119.101:80,:8801-8810,192.168.119.101:9001-9010
	mode http
	log global
	balance url_param name,age #支持对单个及多个url_param 值hash
	server web1 192.168.119.103:80 weight 1 check inter 3000 fall 2 rise 5
	server web2 192.168.119.104:80 weight 1 check inter 3000 fall 2 rise 5
4.3.3.2:url_param⼀致性hash配置示例:
listen web_host
	bind 192.168.119.101:80,:8801-8810,192.168.119.101:9001-9010
	mode http
	log global
	balance url_param name,age #支持对单个及多个url_param 值hash
	hash-type consistent
	server web1 192.168.119.103:80 weight 1 check inter 3000 fall 2 rise 5
	server web2 192.168.119.104:80 weight 1 check inter 3000 fall 2 rise 5
4.3.3.3:测试访问:
# curl http://192.168.119.101/app/index.html?name=NAME #单个参数访问
# curl http://192.168.119.101/app/index.html?age=AGE
# curl http://192.168.119.101/app/index.html?age=AGE&&name=NAME #多个参数访问
4.3.4:hdr:
针对用户每个http头部(header)请求中的指定信息做hash,此处由 name指定的http⾸部将会被取出并做hash计算,然后由服务器总权重相除以后派发至某挑出的服务器,假如⽆有效的值,则会使用默认的轮询调度。
4.3.4.1:hdr取模法配置示例:
listen web_host
	bind 192.168.119.101:80,:8801-8810,192.168.119.101:9001-9010
	mode http
	log global
	balance hdr(User-Agent)
	server web1 192.168.119.103:80 weight 1 check inter 3000 fall 2 rise 5
	server web2 192.168.119.104:80 weight 1 check inter 3000 fall 2 rise 5
4.3.4.2:⼀致性hash配置示例:
listen web_host
	bind 192.168.119.101:80,:8801-8810,192.168.119.101:9001-9010
	mode http
	log global
	balance hdr(User-Agent)
	hash-type consistent
	server web1 192.168.119.103:80 weight 1 check inter 3000 fall 2 rise 5
	server web2 192.168.119.104:80 weight 1 check inter 3000 fall 2 rise 5
4.3.3.3:测试访问:
4.3.5:rdp-cookie:
rdp-cookie可以实现对windows远程桌面的负载,如果有多个后端windows Server服务器,rdp-cookie可以实现同⼀个window server的请求始终被转发给同⼀个后端服务器,如果之前从未访问过,那么第⼀次使用连接roundrobin算法计算出⼀个后端服务器并进行转发。
http://cbonte.github.io/haproxy-dconv/2.2/configuration.html#persist+rdp-cookie
https://www.loadbalancer.org/blog/load-balancing-windows-terminalserver-haproxy-and-rdp-cookies/
4.3.5.1:rdp-cookie取模法配置示例:
listen RDP
bind 192.168.119.101:3389
balance rdp-cookie
mode tcp
server rdp0 172.18.132.20:3389 check fall 3 rise 5 inter 2000 weight 1
4.3.5.2:rdp-cookie⼀致性hash配置示例:
listen RDP
	bind 172.31.7.201:3389
	mode tcp
	balance rdp-cookie
	persist rdp-cookie #启用基于RDP cookie的持久连接,同⼀个cookie就转发给对应的服务器。
	tcp-request inspect-delay 5s #设置内容检查期间等待数据的最大允许时间
	tcp-request content accept if RDP_COOKIE #匹配RDP_COOKIE存在就接受请求
	#hash-type consistent
	server win-server1 192.168.4.0:3389 check fall 3 rise 5 inter 2000 weight 1
4.3.5.3:测试访问:
4.3.5.4:基于iptables实现:
net.ipv4.ip_forward = 1 #必须开启ip转发功能
# iptables -t nat -A PREROUTING -d 192.168.119.101 -p tcp --dport 3389 -j DNAT --to-destination 192.168.4.0:3389
# iptables -t nat -A POSTROUTING -s 192.168.4.0/21 -j SNAT --to-source 192.168.119.101
4.3.6:random:
在1.9版本开始增加⼀个叫做random的负载平衡算法,其基于⼀个随机数作为⼀致性hash的key,随机负载平衡对于大型服务器场或经常添加或删除服务器非常有用。
4.3.6.1:random配置实例:
listen web_host
	bind 192.168.119.101:80,:8801-8810,192.168.119.101:9001-9010
	mode http
	log global
	balance random
	server web1 192.168.119.103:80 weight 1 check inter 3000 fall 2 rise 5
	server web2 192.168.119.104:80 weight 1 check inter 3000 fall 2 rise 5
4.3.7:算法总结:
static-rr--------->tcp/http 静态
first------------->tcp/http 静态

roundrobin-------->tcp/http 动态
leastconn--------->tcp/http 动态
random------------>tcp/http 动态

source------------>tcp/http
Uri--------------->http
url_param--------->http 取决于hash_type是否consistent
hdr--------------->http
rdp-cookie-------->tcp

# 如果mode是tcp,算法用的是只能用http的算法,例如url_param,会自动把算法改为roundrobin
4.3.8:各算法使用场景:
first #使用较少

static-rr #做了session共享的web集群
roundrobin
random
leastconn #数据库
source #基于客户端公网IP的会话保持

Uri--------------->http #缓存服务器,CDN服务商,蓝汛、百度、阿里云、腾讯
url_param--------->http

hdr() #基于客户端请求报文头部做下⼀步处理.例如   balance hdr(User-Agent)

rdp-cookie #很少使用
4.3.9:layer 4与layer 7:
四层:IP+PORT转发
七层:协议+内容交换
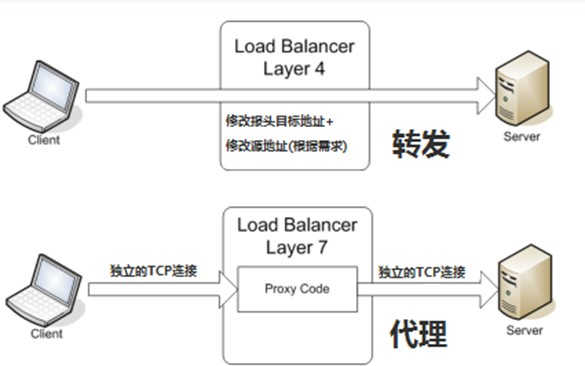
4.3.9.1:四层负载:
在四层负载设备中,把client发送的报文目标地址(原来是负载均衡设备的IP地址),根据均衡设备设置的选择web服务器的规则选择对应的web服务器IP地址,这样client就可以直接跟此服务器建立TCP连接并发送数据。
4.3.9.2:七层代理:
七层负载均衡服务器起了⼀个反向代理服务器的作用,服务器建立⼀次TCP连接要三次握⼿,而client要访问webserver要先与七层负载设备进行三次握⼿后建立TCP连接,把要访问的报文信息发送给七层负载均衡;然后七层负载均衡再根据设置的均衡规则选择特定的webserver,然后通过三次握⼿与此台webserver建立TCP连接,然后webserver把需要的数据发送给七层负载均衡设备,负载均衡设备再把数据发送给client;所以,七层负载均衡设备起到了代理服务器的作用。
# tcpdump tcp -i eth0 -nn port ! 22 -w dump-tcp.pcap -v
Proto Recv-Q Send-Q Local Address Foreign Address State PID/Program name
#客户端请求HAProxy
tcp 0 0 47.90.22.132:80 111.199.184.27:3125 ESTABLISHED 27313/haproxy

#HAProxy与Nginx的连接
tcp 0 0 10.25.144.141:41658 10.25.144.141:81 ESTABLISHED 27313/haprox
4.4:IP透传:
web服务器中需要记录客户端的真实IP地址,用于做访问统计、安全防护、行为分析、区域排行等场景。
4.4.1:四层IP透传:
haproxy 配置:
listen web_prot_http_nodes
	bind 192.168.119.101:80
	mode tcp
	balance roundrobin
	server web1 192.168.119.103:80 send-proxy check inter 3000 fall 3 rise 5
# 主要是要加send-proxy这个参数

nginx配置:
	server {
		listen 80 proxy_protocol;
		#listen 80;
		server_name blogs.12345.net;
......
# Nginx的listen需要加上参数proxy_protocol


log_format access_json '{"@timestamp":"$time_iso8601",'
	'"host":"$server_addr",'
	'"clientip":"$remote_addr",'
	'"size":$body_bytes_sent,'
	'"responsetime":$request_time,'
	'"upstreamtime":"$upstream_response_time",'
	'"upstreamhost":"$upstream_addr",'
	'"http_host":"$host",'
	'"uri":"$uri",'
	'"domain":"$host",'
	'"xff":"$http_x_forwarded_for",'
	'"referer":"$http_referer",'
	'"tcp_xff":"$proxy_protocol_addr",'
	'"http_user_agent":"$http_user_agent",'
	'"status":"$status"}';

# 	'"tcp_xff":"$proxy_protocol_addr",'透传IP

access_log /apps/nginx/logs/access_json.log access_json;
haproxy的server参数,支持域名
haproxy 配置:
listen web_prot_http_nodes
	bind 192.168.119.101:80
	mode tcp
	balance roundrobin
	server web1 blogs.12345.net:80 send-proxy check inter 3000 fall 3 rise 5
# 主要是要加send-proxy这个参数

nginx配置:
	server {
		listen 80 proxy_protocol;
		#listen 80;
		server_name blogs.12345.net;
......
4.4.2:七层IP透传:
当haproxy⼯作在七层的时候,如何透传客户端真实IP⾄后端服务器
4.4.2.1:HAProxy配置:
haproxy 配置:
defaults
option forwardfor

或者:
option forwardfor header X-Forwarded-xxx #自定义传递IP参数,后端web服务器写X-Forwarded-xxx,如果写option forwardfor则后端服务器web格式为X-Forwarded-For

listen配置:
listen web_host
	bind 192.168.119.101:80
	mode http
	log global
	balance random
	server web1 192.168.119.103:80 weight 1 check inter 3000 fall 2 rise 5
	server web2 192.168.119.104:80 weight 1 check inter 3000 fall 2 rise 5
4.4.2.2:web服务器日志格式配置:
配置web服务器,记录负载均衡透传的客户端IP地址
#apache 配置:
LogFormat "%{X-Forwarded-For}i %a %l %u %t \"%r\" %>s %b \"%{Referer}i\" \"%{User-Agent}i\"" combined

#tomcat 配置:
pattern='%{X-Forwarded-For}i %l %T %t "%r" %s %b "%{User-Agent}i"'/>

#nginx 日志格式:
log_format main '"$http_x_forwarded_For" - $remote_user [$time_local] "$request" '
				'$status $body_bytes_sent "$http_referer" '
				'"$http_user_agent" ';
4.4.2.3:验证客户端IP地址:
Nginx访问日志:
apache日志:
五:高级功能及配置:
介绍HAProxy⾼级配置及实用案例
5.1:基于cookie的会话保持:
cookie value:为当前server指定cookie值,实现基于cookie的会话黏性
5.1.1:配置选项:
cookie name [ rewrite | insert | prefix ][ indirect ] [nocache ][ postonly ] [ preserve ][ httponly ] [ secure ][domain ]* [ maxidle <idle> ][ maxlife ]
	name:cookie 的key名称,用于实现持久连接
	insert:#如果客户端请求报文没有cookie就插入新的cookie到响应报文,如第⼀次访问HAProxy
	indirect:#不会向客户端发送服务器已经处理过请求的cookie信息,⽐如后端服务器宕机后HAProxy将客户端请求强制转发⾄real server则会涉及修改cookie,不建议配置
	nocache:#当client和hapoxy之间有缓存时,haproxy不缓存客户端cookie,因为客户端浏览器会缓存cookie并携带cookie访问haproxy
5.1.2:配置示例:
listen web_host
	bind 192.168.119.101:80
	mode http
	log global
	balance roundrobin
	cookie SERVER-COOKIE insert indirect nocache
	server web1 192.168.119.103:80 cookie web1 check inter 3000 fall 3 rise 5
	server web2 192.168.119.104:80 cookie web2 check inter 3000 fall 3 rise 5
# cookie web2  这个web2是cookie的名字可以自己定义
5.1.3:验证cookie信息:
浏览器验证:
通过命令行验证:
[root@server3 app]# curl --cookie "SERVER-COOKIE=web1" http://192.168.119.101/app/index.html
app1 192.168.119.103
[root@server3 app]# curl --cookie "SERVER-COOKIE=web2" http://192.168.119.101/app/index.html
app2 192.168.119.104
5.2:HAProxy状态页:
通过web界面,显示当前HAProxy的运行状态。
https://cbonte.github.io/haproxydconv/2.0/configuration.html#4-stats+uri
5.2.1:状态页配置项:
stats enable #基于默认的参数启⽤stats page
stats hide-version #隐藏版本
stats refresh <delay> #设定自动刷新时间间隔
stats uri <prefix> #自定义stats page uri,默认值:/haproxy?stats
stats realm <realm> #账户认证时的提示信息,示例:stats realm :HAProxy\ Statistics
stats auth <user>:<passwd> #认证时的账号和密码,可使用多次,默认:no authentication
stats admin { if | unless } <cond> #启⽤stats page中的管理功能
5.2.2:启用状态页:
listen stats
	bind :9009
	stats enable
	#stats hide-version
	stats uri /haproxy-status
	stats realm HAPorxy\ Stats\ Page
	stats auth haadmin:123456
	stats auth admin:123456
	#stats refresh 30s
	#stats admin if TRUE
5.2.3:登录状态页:
pid = 3698 (process #2, nbproc = 2, nbthread = 1) #pid为当前pid号,process为当前进程号,nbproc和nbthread为⼀共多少进程和每个进程多少个线程
uptime = 0d 0h00m08s #启动了多长时间
system limits: memmax = unlimited; ulimit-n = 131124 #系统资源限制:内存/最大打开文件数/
maxsock = 131124; maxconn = 65536; maxpipes = 0 #最大socket连接数/单进程最大连接数/最大管道数maxpipes
current conns = 1; current pipes = 0/0; conn rate = 1/sec #当前连接数/当前管道数/当前连接速率
Running tasks: 1/9; idle = 100 % #运行的任务/当前空闲率
active UP:#在线服务器
backup UP:#标记为backup的服务器

active UP, going down:#监测未通过正在进入down过程
backup UP, going down:#备份服务器正在进入down过程
active DOWN, going up:#down的服务器正在进入up过程
backup DOWN, going up:#备份服务器正在进入up过程
active or backup DOWN:#在线的服务器或者是backup的服务器已经转换成了down状态
not checked:#标记为不监测的服务器
active or backup DOWN for maintenance (MAINT) #active或者backup服务器⼈为下线的
active or backup SOFT STOPPED for maintenance #active或者backup被⼈为软下线(⼈为将weight改成0)
5.2.4:backend server信息:
| session rate(每秒的连接会话信息): | Errors(错误统计信息): |
|---|---|
| cur:每秒的当前会话数量 | Req:错误请求量 |
| max:每秒新的最大会话数量 | conn:错误链接量 |
| limit:每秒新的会话限制量 | Resp:错误响应量 |
| sessions(会话信息): | Warnings(警告统计信息): |
| cur:当前会话量 | Retr:重新尝试次数 |
| max:最大会话量 | Redis:再次发送次数 |
| limit: 限制会话量 | |
| Total:总共会话量 | Server(real server信息): |
| LBTot:选中⼀台服务器所用的总时间 | Status:后端机的状态,包括UP和DOWN |
| Last:和服务器的持续连接时间 | LastChk:持续检查后端服务器的时间 |
| Wght:权重 | |
| Bytes(流量统计): | Act:活动链接数量 |
| In:网络的字节输入总 | Bck:备份的服务器数量 |
| Out:网络的字节输出总量 | Chk:⼼跳检测时间 |
| Dwn:后端服务器连接后都是DOWN的数量 | |
| Denied(拒绝统计信息): | Dwntme:总的downtime时间 |
| Req:拒绝请求量 | Thrtle:server 状态 |
| Resp:拒绝回复量 |
5.3:报文修改:
在http模式下,基于实际需求修改客户端的请求报文与响应报文,通过reqadd和reqdel在请求报文添加删除字段,通过rspadd与rspidel在响应报文中添加与删除字段。
在请求报文尾部添加指定首部
	reqadd <string> [{if | unless} <cond>]  # 新版本这个指令已经不能用了,新版本需要用到 http-response add-header
	http-response del-header <name>  # 新版本可用,老版本不能用

从请求报文中删除匹配正则表达式的首部
	reqdel <search> [{if | unless} <cond>]
	reqidel <search> [{if | unless} <cond>]

在响应报文尾部添加指定首部
	rspadd <string> [{if | unless} <cond>]
	示例:
	rspadd X-Via:\ HAPorxy

从响应报文中删除匹配正则表达式的首部
	rspidel <search> [{if | unless} <cond>]
	rspidel <search> [{if | unless} <cond>]
	示例:
	rspidel X-Powered-By:.* #从响应报文删除X-Powered-By信息,
	rspidel server.* #从响应报文删除server信息 ,新版本这个指令已经不能用了,需要用http-response del-header
	http-response del-header  server  # 新版本可用,旧版本不支持
	http-response del-header  etag
5.4:HAProxy日志配置:
配置HAProxy记录日志到指定日志文件中
5.4.1:HAProxy配置:
在global配置项定义:
log 127.0.0.1 local{1-7} info #基于syslog记录日志到指定设备,级别有(err、warning、info、debug)

listen web_port
	bind 127.0.0.1:80
	mode http
	log global
	server web1 127.0.0.1:8080 check inter 3000 fall 2 rise 5

# systemctl restart haproxy
5.4.2:Rsyslog配置:
vim /etc/rsyslog.conf
$ModLoad imudp
$UDPServerRun 514
local3.* /var/log/haproxy.log

# systemctl restart rsyslog
5.4.3:验证HAProxy日志:
重启syslog服务并访问app⻚面,然后验证是否⽣成日志
# tail -f /var/log/haproxy.log
Aug 14 20:21:06 localhost haproxy[18253]: Connect from 192.168.0.1:3050 to 192.168.119.101:80 (web_host/HTTP)
Aug 14 20:21:06 localhost haproxy[18253]: Connect from 92.168.0.1:3051 to 192.168.119.101:80 (web_host/HTTP)
Aug 14 20:21:06 localhost haproxy[18253]: Connect from 192.168.0.1:3050 to 192.168.119.101:80 (web_host/HTTP)
5.5:自定义日志格式:
将特定信息记录在日志中
5.5.1:配置选项:
capture cookie <name> len <length> #捕获请求和响应报文中的cookie并记录日志
capture request header <name> len <length> #捕获请求报文中指定的首部内容和长度并记录日志
capture response header <name> len <length> #捕获响应报文中指定的内容和长度首部并记录日志
	示例:
	capture request header Host len 256
	capture request header User-Agent len 512
	capture request header Referer len 15
5.5.2:配置示例:
listen web_host
	bind 192.168.119.101:80
	mode http
	balance roundrobin
	log global
	option httplog #日志格式选项
	capture request header X-Forwarded-For len 15
	capture request header User-Agent len 512
	cookie SERVER-COOKIE insert indirect nocache
	server web1 192.168.119.103:80 cookie web1 check inter 3000 fall 3 rise 5
	server web2 192.168.119.104:80 cookie web2 check inter 3000 fall 3 rise 5
5.5.3:验证日志格式:
5.6:压缩功能
对响应给客户端的报文进行压缩,以节省网络带宽,但是会占用部分CPU性能。
5.6.1:配置选项:
compression algo #启⽤http协议中的压缩机制,常用算法有gzip deflate
	identity #调试使用的压缩方式
	gzip #常用的压缩方式,与各浏览器兼容较好
	deflate #有些浏览器不支持
	raw-deflate #新出的压缩方式
compression type #要压缩的文件类型
5.6.2:配置示例:
listen web_host
	bind 192.168.119.101:80
	mode http
	balance roundrobin
	log global
	option httplog
	#capture request header X-Forwarded-For len 15
	#capture request header User-Agent len 512
	compression algo gzip deflate
	compression type compression type text/plain text/html text/css text/xml text/javascript application/javascript
	cookie SERVER-COOKIE insert indirect nocache
	server web1 192.168.119.103:80 cookie web1 check inter 3000 fall 3 rise 5
	server web2 192.168.119.104:80 cookie web2 check inter 3000 fall 3 rise 5
5.6.3:验证压缩功能:
5.7:web服务器状态监测:
基于不同的监测方式,对后端real server进行状态监测
option httpchk
option httpchk <uri>
option httpchk <method> <uri>
option httpchk <method> <uri> <version>
5.7.1:三种状态监测方式:
基于四层的传输端口做状态监测
基于指定URI 做状态监测
基于指定URI的request请求头部内容做状态监测
5.7.2:配置示例:
listen web_host
	bind 192.168.119.101:80
	mode http
	balance roundrobin
	log global
	option httplog
	#option httpchk GET /app/monitor/check.html HTTP/1.0
	option httpchk HEAD /app/monitor/check.html HTTP/1.0\r\nHost:\ 192.168.119.102
	cookie SERVER-COOKIE insert indirect nocache
	server web1 192.168.119.103:80 cookie web1 check inter 3000 fall 3 rise 5
	server web2 192.168.119.104:80 cookie web2 check inter 3000 fall 3 rise 5
5.7.3:验证http监测:
5.8:ACL:
访问控制列表(ACL,Access Control Lists)是⼀种基于包过滤的访问控制技术,它可以根据设定的条件对经过服务器传输的数据包进行过滤(条件匹配),即对接收到的报文进行匹配和过滤,基于请求报文头部中的源地址、源端口、目标地址、目标端口、请求方法、URL、文件后缀等信息内容进行匹配并执行进⼀步操作,⽐如允许其通过或丢弃。
http://cbonte.github.io/haproxydconv/2.0/configuration.html#7
5.8.1:ACL配置选项:
acl		<aclname>	<criterion>		[flags]		[operator]		[<value>]
acl		名称			匹配规范		匹配模式	具体操作符		操作对象类型
5.8.1.1:ACL-Name:
acl image_service hdr_dom(host) -i img.12345.com

ACL名称,可以使用大字⺟A-Z、小写字⺟a-z、数字0-9、冒号:、点.、中横线和下划线,并且严格区分大小写,⽐如Image_site和image_site就是两个完全不同的acl。
5.8.1.2:ACL-criterion:
定义ACL匹配规范
hdr([<name> [,<occ>]]):完全匹配字符串,header的指定信息
hdr_beg([<name> [,<occ>]]):前缀匹配,header中指定匹配内容的begin
hdr_end([<name> [,<occ>]]):后缀匹配,header中指定匹配内容end
hdr_dom([<name> [,<occ>]]):域匹配,header中的domain name

hdr_dir([<name> [,<occ>]]):路径匹配,header的uri路径
hdr_len([<name> [,<occ>]]):长度匹配,header的长度匹配
hdr_reg([<name> [,<occ>]]):正则表达式匹配,自定义表达式(regex)模糊匹配
hdr_sub([<name> [,<occ>]]):子串匹配,header中的uri模糊匹配

dst 目标IP
dst_port 目标PORT

src 源IP
src_port 源PORT

示例:
hdr(<string>) 用于测试请求头部首部指定内容
hdr_dom(host) 请求的host名称,如 www.12345.com
hdr_beg(host) 请求的host开头,如 www. img. video. download. ftp.
hdr_end(host) 请求的host结尾,如 .com .net .cn
path_beg 请求的URL开头,如/static、/images、/img、/css
path_end 请求的URL中资源的结尾,如 .gif .png .css .js .jpg .jpeg

有些功能是类似的,⽐如以下⼏个都是匹配用户请求报文中host的开头是不是www:
	acl short_form hdr_beg(host) www.
	acl alternate1 hdr_beg(host) -m beg www.
	acl alternate2 hdr_dom(host) -m beg www.
	acl alternate3 hdr(host) -m beg www.
5.8.1.3:ACL-flags:
ACL匹配模式
-i 不区分大小写
-m 使用指定的pattern匹配方法
-n 不做DNS解析
-u 禁⽌acl重名,否则多个同名ACL匹配或关系
5.8.1.4:ACL-operator:
ACL 操作符
整数⽐较:eq、ge、gt、le、lt
字符⽐较:
- exact match (-m str) :字符串必须完全匹配模式
- substring match (-m sub) :在提取的字符串中查找模式,如果其中任何⼀个被发现,ACL将匹配
- prefix match (-m beg) :在提取的字符串首部中查找模式,如果其中任何⼀个被发现,ACL将匹配
- suffix match (-m end) :将模式与提取字符串的尾部进行⽐较,如果其中任何⼀个匹配,则ACL进行匹配
- subdir match (-m dir) :查看提取出来的用斜线分隔(“/”)的字符串,如果其中任何⼀个匹配,则ACL进行匹配
- domain match (-m dom) :查找提取的用点(“.”)分隔字符串,如果其中任何⼀个匹配,则ACL进行匹配
5.8.1.5:ACL-value:
value的类型
The ACL engine can match these types against patterns of the following types :
- Boolean #布尔值
- integer or integer range #整数或整数范围,⽐如用于匹配端口范围
- IP address / network #IP地址或IP范围, 192.168.0.1,192.168.0.1/24
- string--> www.12345.com
	exact –精确⽐较
	substring—子串
	suffix-后缀⽐较
	prefix-前缀⽐较
	subdir-路径, /wp-includes/js/jquery/jquery.js
	domain-域名,www.12345.com
- regular expression #正则表达式
- hex block #16进制
5.8.2:ACL调用方式:
ACL调用方式:
- 与:隐式(默认)使用
- 或:使用"or" 或 "||"表示
- 否定:使用“!“ 表示

示例:
	if valid_src valid_port #与关系,A和B都要满⾜为true
	if invalid_src || invalid_port #或,A或者B满⾜⼀个为true
	if ! invalid_src #非,取反,A和B哪个也不满⾜为true
5.8.3:ACL示例-域名匹配:
listen web_host
	bind 192.168.119.101:80
	mode http
	balance roundrobin
	log global
	option httplog
	acl web_host hdr_dom(host) www.12345.net
	use_backend 12345_host if web_host
	default_backend default_web

backend 12345_host
	mode http
	server web1 192.168.119.103 check inter 2000 fall 3 rise 5
	backend default_web
	mode http
	server web1 192.168.119.104:80 check inter 2000 fall 3 rise 5
5.8.4:ACL示例-基于源IP或子网调度访问:
将指定的源地址调度至指定的web服务器组。
listen web_host
	bind 192.168.119.101:80
	mode http
	balance roundrobin
	log global
	option httplog
	acl ip_range_test src 172.18.0.0/16 192.168.119.103
	use_backend 12345_host if ip_range_test

	default_backend default_web

backend 12345_host
	mode http
	server web1 192.168.119.103 check inter 2000 fall 3 rise 5

backend default_web
	mode http
	server web1 192.168.119.104:80 check inter 2000 fall 3 rise 5
5.8.5:ACL示例-基于源地址的访问控制:
拒绝指定IP或者IP范围访问
listen web_host
	bind 192.168.119.101:80
	mode http
	balance roundrobin
	log global
	option httplog
	acl block_test src 192.168.119.103 192.168.0.0/24
	# block if block_test  # 新版本,这个参数已经不能使用了,需要用http-request deny变了
	http-request deny if block_test


	default_backend default_web

backend magedu_host
	mode http
	server web1 192.168.119.103 check inter 2000 fall 3 rise 5

backend default_web
	mode http
	server web1 192.168.119.104:80 check inter 2000 fall 3 rise 5
5.8.6:ACL示例-匹配浏览器类型:
匹配客户端浏览器,将不同类型的浏览器调动至不同的服务器组
listen web_host
	bind 192.168.119.101:80
	mode http
	balance roundrobin
	log global
	option httplog
	acl web_host hdr_dom(host) www.12345.net
	use_backend magedu_host if web_host
	acl redirect_test hdr(User-Agent) -m sub -i "Mozilla/5.0 (Windows NT 6.1; WOW64; Trident/7.0; rv:11.0) like Gecko"
	redirect prefix http://192.168.119.103 if redirect_test

	default_backend default_web


backend magedu_host
	mode http
	server web1 192.168.119.103 check inter 2000 fall 3 rise 5


backend default_web
	mode http
	server web1 192.168.119.104:80 check inter 2000 fall 3 rise 5
5.8.7:ACL示例-基于文件后缀名实现动静分离:
listen web_host
	bind 192.168.119.101:80
	mode http
	balance roundrobin
	log global
	option httplog
	acl php_server path_end -i .php
	use_backend php_server_host if php_server
	acl image_server path_end -i .jpg .png .jpeg .gif
	use_backend image_server_host if image_server

	default_backend default_web

backend php_server_host
	mode http
	server web1 192.168.119.103 check inter 2000 fall 3 rise 5

backend image_server_host
	mode http
	server web1 192.168.119.104 check inter 2000 fall 3 rise 5

backend default_web
	mode http
	server web1 192.168.119.102:80 check inter 2000 fall 3 rise 5

# curl http://192.168.119.101/app/test.php
php
5.8.8:ACL-匹配访问路径实现动静分离:
listen web_host
	bind 192.168.119.101:80
	mode http
	balance roundrobin
	log global
	option httplog
	acl static_path path_beg -i /static /images /javascript
	use_backend static_path_host if static_path
	default_backend default_web

backend static_path_host
	mode http
	server web1 192.168.119.104 check inter 2000 fall 3 rise 5

backend default_web
	mode http
	server web1 192.168.119.102:80 check inter 2000 fall 3 rise 5
5.8.9:ACL示例-基于ACL的HTTP访问控制:
listen web_host
	bind 192.168.119.101:80
	mode http
	balance roundrobin
	log global
	option httplog
	acl static_path path_beg -i /static /images /javascript
	use_backend static_path_host if static_path

	acl badguy_deny src 192.168.119.102
	http-request deny if badguy_deny
	http-request allow
	default_backend default_web

backend static_path_host
	mode http
	server web1 192.168.119.104 check inter 2000 fall 3 rise 5
	backend default_web
	mode http
	server web1 192.168.119.102:80 check inter 2000 fall 3 rise 5
测试:
[root@server2 ~]# curl --head http://192.168.119.101/static/1.jpg
HTTP/1.1 403 Forbidden
Content-length: 93
Cache-Control: no-cache
Connection: close
Content-Type: text/html
5.8.10:ACL示例-预定义ACL使用:
http://cbonte.github.io/haproxy-dconv/2.0/configuration.html#7.4
5.8.10.1:预定义ACL:
| ACL name | Equivalent to | Usage |
|---|---|---|
| FALSE | always_false | never match |
| HTTP | req_proto_http | match if protocol is valid HTTP |
| HTTP_1.0 | req_ver 1.0 | match HTTP version 1.0 |
| HTTP_1.1 | req_ver 1.1 | match HTTP version 1.1 |
| HTTP_CONTENT | hdr_val(contentlength) gt 0 | match an existing content-length |
| HTTP_URL_ABS | url_reg ^[^/:]*:// | match absolute URL with scheme |
| HTTP_URL_SLASH | url_beg / | match URL beginning with "/" |
| HTTP_URL_STAR | url * | match URL equal to "*" |
| LOCALHOST | src 127.0.0.1/8 | match connection from local host |
| METH_CONNECT | method CONNECT | match HTTP CONNECT method |
| METH_DELETE | method DELETE | match HTTP DELETE method |
| METH_GET | method GET HEAD | match HTTP GET or HEAD method |
| METH_HEAD | method HEAD | match HTTP HEAD method |
| METH_OPTIONS | method OPTIONS | match HTTP OPTIONS method |
| METH_POST | method POST | match HTTP POST method |
| METH_PUT | method PUT | match HTTP PUT method |
| METH_TRACE | method TRACE | match HTTP TRACE method |
| RDP_COOKIE | req_rdp_cookie_cnt gt 0 | match presence of an RDP cookie |
| REQ_CONTENT | req_len gt 0 | match data in the request buffer |
| TRUE | always_true | always match |
| WAIT_END | wait_end | wait for end of content analysis |
5.8.10.2:预定义ACL使用:
listen web_host
	bind 192.168.119.101:80
	mode http
	balance roundrobin
	log global
	option httplog

	acl static_path path_beg -i /static /images /javascript
	use_backend static_path_host if ! HTTP_1.1 TRUE static_path
	default_backend default_web

backend php_server_host
	mode http
	server web1 192.168.119.103 check inter 2000 fall 3 rise 5

backend static_path_host
	mode http
	server web1 192.168.119.104 check inter 2000 fall 3 rise 5

backend default_web
	mode http
	server web1 192.168.119.102:80 check inter 2000 fall 3 rise 5
5.9:自定义HAProxy错误界面:
对指定的报错进行重定向,进行优雅的显示错误页面

5.9.1:基于错误页面文件:
defaults
#option forwardfor
#no option http-use-htx
#...... #以下三行
errorfile 500 /usr/local/haproxy/html/500.html
errorfile 502 /usr/local/haproxy/html/502.html
errorfile 503 /usr/local/haproxy/html/503.html

# 没有文件的errorfile要注释掉,不然会报错;重启haproxy之前,要确定报错文件是否存在


~]# cat /usr/local/haproxy/html/503.html
HTTP/1.1 503 Service Unavailable
Content-Type:text/html;charset=utf-8

<!DOCTYPE html>
<html lang="en">
<head>
	<meta charset="UTF-8">
	<title>error</title>
</head>
<body>
<h1>页面维护中</h1>
<h2>503 请联系总部:18600000000</h2>
</body>
</html>

5.9.2:基于http重定向:
defaults
#option http-keep-alive
#option forwardfor
#no option http-use-htx
#...... 以下⼀行
errorloc 503 http://192.168.119.102/error_page/503.html
5.10:HAProxy四层负载:
针对有特殊访问写完的应用场景
Memcache
Redis
MySQL
RabbitMQ
5.10.1:四层负载示例:
listen redis-port
	bind 192.168.119.102:6379
	mode tcp
	balance leastconn
	server server1 192.168.119.104:6379 check
	server server1 192.168.119.103:6379 check backup
5.10.2:ACL示例-四层访问控制:
listen web_host
	bind 192.168.119.101:80
	mode http
	balance roundrobin
	log global
	option httplog

	acl static_path path_beg -i /static /images /javascript
	use_backend static_path_host if HTTP_1.1 TRUE static_path

	acl invalid_src src 192.168.1.0/24 192.168.119.102
	tcp-request connection reject if invalid_src

	default_backend default_web


backend php_server_host
	mode http
	server web1 192.168.119.103 check inter 2000 fall 3 rise 5

backend static_path_host
	mode http
	server web1 192.168.119.104 check inter 2000 fall 3 rise 5

backend default_web
	mode http
	server web1 192.168.119.102:80 check inter 2000 fall 3 rise 5
5.11:HAProxy https实现:
配置HAProxy⽀持https协议:
支持ssl会话;
	bind *:443 ssl crt /PATH/TO/SOME_PEM_FILE
	crt 后证书文件为PEM格式,且同时包含证书和所有私钥
		cat demo.crt demo.key > demo.pem
把80端口的请求重向定443
	bind *:80
	redirect scheme https if !{ ssl_fc }

	# 向后端传递用户请求的协议和端口(frontend或backend)
	http_request set-header X-Forwarded-Port %[dst_port]
	http_request add-header X-Forwared-Proto https if { ssl_fc }
5.11.1:证书制作:
# mkdir /apps/haproxy/certs
# cd /apps/haproxy/certs
# openssl genrsa -out haproxy.key 2048
# openssl req -new -x509 -key haproxy.key -out haproxy.crt -subj "/CN=www.12345.net"
# cat haproxy.key haproxy.crt > haproxy.pem
# openssl x509 -in haproxy.pem -noout -text #查看证书
5.11.2:https配置示例:
#web server http
frontend web_server-http
	bind 192.168.119.101:80
	redirect scheme https if !{ ssl_fc }  # 全站https主要选项
	mode http
	use_backend web_host

# web server https
frontend web_server-https
	bind 192.168.119.101:443 ssl crt /apps/haproxy/certs/haproxy.pem
	mode http
	use_backend web_host

backend default_host
	mode http
	server web1 192.168.119.102:80 check inter 2000 fall 3 rise 5

backend web_host
	mode http
	http-request set-header X-Forwarded-Port %[dst_port]
	http-request add-header X-Forwarded-Proto https if { ssl_fc }
	server web1 192.168.119.103:80 check inter 2000 fall 3 rise 5
	server web2 192.168.119.104:80 check inter 2000 fall 3 rise 5
5.11.3:验证https:
六:重点部分:
6.1:HAProxy调度算法
重要
6.2:动静分离与客户端源IP透传:
客户端IP透传重要
6.3:ACL使用与报文修改:
6.4:服务器动态下线:
编写shell脚本,实现能够基于参数传递real server服务器IP,并实现将其从多个HAProxy进程下线与上线
配置文件里,给每个进程定义sock文件
stats socket /var/lib/haproxy/haproxy1.sock mode 600 level admin process 1
stats socket /var/lib/haproxy/haproxy2.sock mode 600 level admin process 2
安装
ubunut安装:
打开:https://haproxy.debian.net/
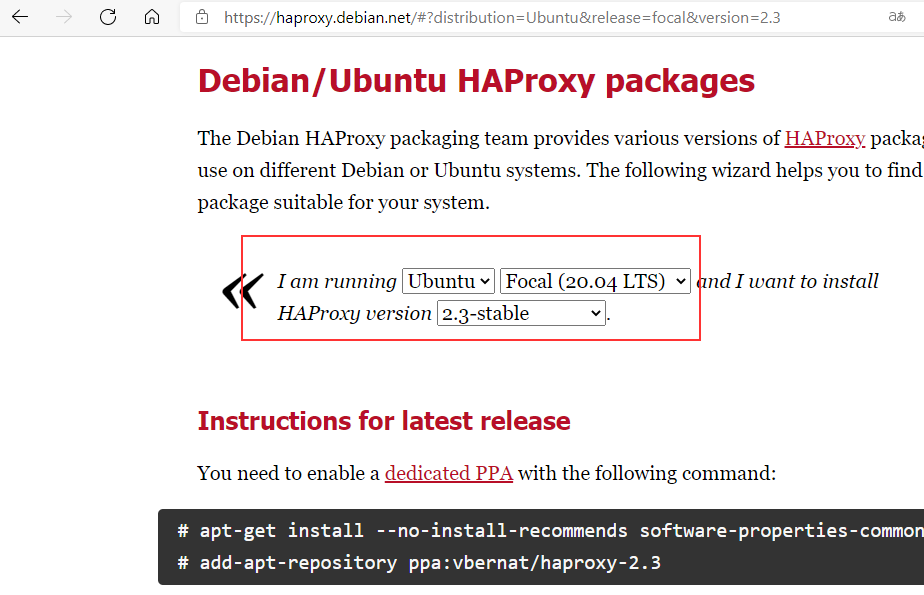
选择自己的操作系统版本号,和需要安装的haproxy版本,按照提示安装即可
net.ipv4.ip_nonlocal_bind = 1   # 启动haproxy的时候,允许忽视VIP的存在
net.ipv4.ip_forward = 1
centos安装:
centos7自带的yum源带的版本比较老,可以使用pkgs.org上面提供的rpm包安装,也可以源码编译安装
一、 pkgs.ogr下载rpm包安装
1.下载rpm包
wget https://repo.ius.io/testing/7/x86_64/packages/h/haproxy22-2.2.10-1.el7.ius.x86_64.rpm
2.安装yum源
wget https://repo.ius.io/ius-release-el7.rpm
yum install ius-release-el7.rpm  -y
yum list haproxy*
Loaded plugins: fastestmirror
Loading mirror speeds from cached hostfile
Installed Packages
haproxy22.x86_64     2.2.10-1.el7.ius         @/haproxy22-2.2.10-1.el7.ius.x86_64                                    1.8.26-1.el7.ius                                      ius             haproxy20.x86_64     2.0.17-1.el7.ius                                      ius
yum 可以直接安装haproxy22.x86_64 这样就不需要第一步的rpm下载了
yum 源必须配置,新版本的rpm包依赖centos7上的版本太低
二、编译安装
haproxy.service 留下备用
[root@keepalived01 ~]# cat /lib/systemd/system/haproxy.service
[Unit]
Description=HAProxy Load Balancer
After=network-online.target
Wants=network-online.target

[Service]
EnvironmentFile=-/etc/sysconfig/haproxy
Environment="CONFIG=/etc/haproxy/haproxy.cfg" "PIDFILE=/run/haproxy.pid"
ExecStartPre=/usr/sbin/haproxy -f $CONFIG -c -q $OPTIONS
ExecStart=/usr/sbin/haproxy -Ws -f $CONFIG -p $PIDFILE $OPTIONS
ExecReload=/usr/sbin/haproxy -f $CONFIG -c -q $OPTIONS
ExecReload=/bin/kill -USR2 $MAINPID
KillMode=mixed
SuccessExitStatus=143
Type=notify

[Install]
WantedBy=multi-user.target
1.源码下载地址
https://www.haproxy.org/
2.上传haproxy到服务器
mv haproxy-2.0.22.tar.gz  /usr/local/src/
cd /usr/local/src/
# 解压
tar xf haproxy-2.0.22.tar.gz
cd haproxy-2.0.22
3.安装编译环境
# 安装编译需要的程序
yum install gcc gcc-c++ glibc glibc-devel pcre pcre-devel openssl openssl-devel readline-devel systemd-devel net-tools vim iotop bc zip unzip zlib-devel lrzsz tree screen lsof tcpdump wget
4.编译参数
curl -R -O wget http://www.lua.org/ftp/lua-5.3.5.tar.gz
tar zxf lua-5.4.3.tar.gz
cd lua-5.4.3
# haproxy 1.8及1.9版本编译参数
make ARCH=x86_64 TARGET=linux2628 USE_PCRE=1 USE_OPENSSL=1 ZLIB=1 USE_SYSTEMD=1 USE_CPU_AFFINITY=1 PREFIX=/apps/haproxy

# HAProxy 2.0编译参数
make ARCH=x86_64 TARGET=linux-glibc USE_PCRE=1 USE_OPENSSL=1 USE_ZLIB=1 USE_SYSTEMD=1 USE_CPU_AFFINITY=1 USE_LUA=1 LUA_INC=/usr/local/src/lua-5.4.3/src/ LUA_LIB=/usr/local/src/lua-5.4.3/src/  PREFIX=/apps/haproxy

# make install FREFIX=/apps/haproxy
# cp haproxy /usr/sbin
编译参数解释
ARCH=
USE_OPENSSL=1 USE_ZLIB=1 USE_PCRE=1 USE_SYSTEMD=1
USE_LUA=1  开启lua
USE_CPU_AFFINITY=1   开启cpu亲和性
TARGET=
generic  平台 generic是通用平台 不知道什么版本内核的时候可以用这个
linux-glibc  内核大于 2.6.28 可以用
USE_LUA=1 LUA_INC=/opt/lua-5.3.5/src LUA_LIB=/opt/lua-5.3.5/src  # 系统自带的lua版本较低,到官方下载新版本
配置文件详解:
global
chroot                                # 锁定运行目录
daemon                                # 以守护进程的方式运行
stats socket /var/lib/haproxy/stats   # socket 文件
user,group,uid,gid                    # 运行haproxy的用户身份
nbproc                                # 开启的haproxy进程数,与cpu保持一致
nbthread                              # 指定每个haproxy进程开启的线程数,默认为每个进程一个线程,
                                        新版本才支持,和nbproc不能同时使用(只能在单进程的时候使用)
cpu-map 1 0                           # 绑定haproxy 进程至指定cpu
maxconn                               # 每个haproxy 进程最大连接数
maxsslconn                            # 每个haproxy进程ssl最大连接数,用于haproxy配置了证书的场景下
maxconnrate                          # 每个进程每秒创建的最大连接数量
spread-checks                        # 后端server 状态check随机提前或延迟百分比时间,建议2-5(20%-50之间)
pidfile                              # 指定pid文件路径
log 127.0.0.1 local3 info            # 定义全局的syslog服务器;最多可以定义两个
proxies配置-defaults:
defaults 配置参数
bind: 指定HAProxy的监听地址,可以是ipv4或者ipv6,可以同时监听多个ip或者端口,可同时用于listen字段中
bind [<address>]:<prot_range>[, ...] [param*]

listen http_proxy   # 监听http的多个IP的多个端口和sock文件
    bind :80,443,:8081-8010
    bind 10.0.0.1:10080,10.0.0.1:10443
    bind /var/run/ssl-frontend.sock user root mode 600 accept-proxy

listen http_htts_proxy  #https监听
    bind :80
    bind :443 ssl crt /etc/haproxy/site.pem

listen http_https_proxy_explicit # 监听ipv6、ipv4和unix sock文件
    bind ipv6@:80
    bind ipv4@public_ssl:443 ssl crt /etc/haproxy/site.pem
    bind unix@ssl-frontend.sock user root mode 600 accept-proxy

listen external_bind_app1  # 监听file descriptor
    bind “fd@${FD_APP1}”

生产示例:
frontend WEB_PORT
    bind :80,:8080
    bind 192.168.119.102:10080,:8801-8810,192.168.119.101:9001-9010
    mode http/tcp      # 指定负载协议类型
    use_backend backend_name  # 调用的后端服务器名称
Proxies配置-backend:
定义一组后端服务器,backend服务器将被frontend进行调用
mode http/tcp  # 指定后端负载协议类型
option         # 配置选项
server         # 定义后端real server
注意: option 后面加httpchk,smtpchk,mysql-check,pasql-check,ssl-hello-chk方法
check  # 对指定real进行健康状态检查,默认不开启
    addr IP           # 可以指定监控状态监测IP
    port num          # 指定健康状态监测端口
    inter num         # 健康状态监测监测时间,默认2000 ms
    fall num          # 后端服务器失效检查次数,默认为3
    rise num          # 后端服务器从下线回复检查次数,默认为2
weight  # 默认为1,最大值为256,0表示不参与负载均衡
backup  #将后端服务器标记为备份状态
disabled # 将后端服务器标记为不可用状态
redirect prefix  http://www.5212345.com    # 将请求临时重定向至其他URL,只适用于http模式
maxconn <maxconn>: 当前后端server的最大并发连接数
backlog <backlog>: 当前server的连接数达到上限后的后援队列长度
frontend+backend配置实例:
[root@localhost ~]# cat /etc/haproxy/haproxy.cfg
global
    log         127.0.0.1 local3 info
    chroot      /var/lib/haproxy
    pidfile     /run/haproxy.pid
    maxconn     100000
    uid 99
    gid 99
    daemon
    nbproc 4
#    nbthread 4
    cpu-map 1 0
    cpu-map 2 1
    cpu-map 3 2
    cpu-map 4 3
    stats socket /var/lib/haproxy/haproxy.sock mode 600 level admin
    spread-checks 5

defaults
    option redispatch
    option forwardfor       except 127.0.0.0/8
    option http-keep-alive
    maxconn                 100000
    mode                    http
    timeout connect         300000ms
    timeout client          300000ms
    timeout server          300000ms
listen stats
    mode http
    bind 0.0.0.0:9999
    stats enable
    log global
    stats uri  /haproxy-status
    stats auth haadmin:q1w2e3r4ys
# 官网业务入口======
frontend WEB_PORT
    bind :80
    use_backend linux38-host
    #redirect prefix http://www.5212345.cn

backend linux38-host
    option  forwardfor
    server web1 10.0.0.105:80 maxconn 5 check addr 10.0.0.105 port 9000 inter 2s fall 3 rise 5
    server web2 10.0.0.104:80 maxconn 5 check addr 10.0.0.105 port 80  inter 2s fall 3 rise 5
Proxies配置-listen替代frontend+backend:
是用listen替代frontend和backend的配置方式:
# 官网业务访问入口============
listen web_port
    bind 10.0.0.200:80
    mode http
    option forwardfor
    server web1 10.0.0.105:80 maxconn 5 check addr 10.0.0.105 port 9000 inter 2s fall 3 rise 5
    server web2 10.0.0.104:80 maxconn 5 check addr 10.0.0.105 port 80  inter 2s fall 3 rise 5
HAProxy调度算法:
HAProxy通过固定参数balance指明对后端服务器的调度算法,该参数可以配置在listen或backend选项中
HAProxy的调度算法分为静态和动态调度算法,但是有些算法可以根据参数在静态或动态算法中相互转换。
4.1: 静态算法:
静态算法:按照事先定义好的规则轮询公平调度,不关心后端服务器的当前负载、链接数和响应速度等,且无法实时修改权重,只能靠重启HAProxy生效
服务器动态权重调整:
yum install -y socat
# Socat 是Linux 下的一个多功能网络工具,名字来由是Socket Cat,socat的主要特点就是在两个数据流之间建立通道,且支持众多协议和链接方式。如IP、TCP、UDP、IPV6、Socket文件等。
# echo "show info" |socat stdio /var/lib/haproxy/haproxy.sock

# echo "get weight web_port/web1" |socat stdio /var/lib/haproxy/haproxy.sock
1 (initial 1)

echo "set weight web_port/web1 2" |socat stdio /var/lib/haproxy/haproxy.sock
注意:这样调整在多进程环境下,会导致一段时间,没有调整完成,因为这个只发给了一个haproxy.sock,解决办法:
stats socket /var/lib/haproxy/haproxy.sock1 mode 600 level admin process 1
stats socket /var/lib/haproxy/haproxy.sock2 mode 600 level admin process 2
stats socket /var/lib/haproxy/haproxy.sock3 mode 600 level admin process 3
stats socket /var/lib/haproxy/haproxy.sock4 mode 600 level admin process 4
每个进程绑定一个sock文件,对所有进程做操作
static-rr:
static-rr: 基于权重的轮询调度,不支持权重的运行时调整及后端服务器慢启动,其后端主机数量没有限制
listen web_host
  bind 10.0.0.101:80,:8801-8810,10.0.0.101:9001-9010
  mode http
  log global
  balance static-rr
  server web1 10.0.0.104:80 weight 1 check  inter 2s fall 3 rise 5
  server web1 10.0.0.105:80 weight 2 check  inter 2s fall 3 rise 5
first:
first: 根据服务器在列表中的位置,自上而下进行调度,但是其只会当第一台服务器连接数达到上限,新请求才会分配给下一台服务器,因此会忽略服务器的权重设置。
listen web_host
  bind 10.0.0.101:80,:8801-8810,10.0.0.101:9001-9010
  mode http
  log global
  balance first
  server web1 10.0.0.104:80 maxconn 5 weight 1 check  inter 2s fall 3 rise 5
  server web1 10.0.0.105:80 maxconn 5 weight 2 check  inter 2s fall 3 rise 5
测试访问效果
while true;do curl http://10.0.0.102/index.html ;down
4.2:动态算法:
动态算法:基于后端服务器状态进行调度适当调整,比如优先调度至当前负载较低的服务器,且权重可以在haproxy运行时动态调整无需重启。
roundrobin:
roundrobin:基于权重的轮询动态调度算法,支持权重的运行时调整,不完全等于lvs中的rr轮询模式,HAProxy中的roundrobin支持慢启动(新加服务器会逐渐增加转发数),且每个后端backend中最多支持4095个real server,roundrobin为默认调度算法,且支持real server 权重动态调整
listen web_host
  bind 10.0.0.101:80,:8801-8810,10.0.0.101:9001-9010
  mode http
  log global
  balance roundrobin
  server web1 10.0.0.104:80 weight 1 check  inter 2s fall 3 rise 5
  server web1 10.0.0.105:80 weight 2 check  inter 2s fall 3 rise 5
动态调整权限
# echo "get weight web_port/web1" |socat stdio /var/lib/haproxy/haproxy.sock

# echo "set weight web_port/web1 3" |socat stdio /var/lib/haproxy/haproxy.sock

[root@localhost ~]# echo "get weight web_port/web1 3" |socat stdio /var/lib/haproxy/haproxy.sock
3 (initial 1)
leastconn
leastconn加权重的最小连接的动态,支持权重的运行时调整和慢启动,即当前后端服务器连接最少的优先调度(新客户端连接),比较适合场链接场景使用,比如mysql等场景
listen web_host
  bind 10.0.0.101:80,:8801-8810,10.0.0.101:9001-9010
  mode http
  log global
  balance leastconn
  server web1 10.0.0.104:80 weight 1 check  inter 2s fall 3 rise 5
  server web1 10.0.0.105:80 weight 1 check  inter 2s fall 3 rise 5
4.3:其他算法:
其他部分算法既可作为静态算法,又可以通过选项成功动态算法
4.3.1 source:
源地址hash,基于用户源地址hash并将请求转发到后端服务器,默认为静态即模方式,但是可以通过hash-type支持的选项更改,后续同一个源地址请求将被转发至同一个后端web服务器,比较适用于session保持/缓存业务等场景。
源地址有两种转发客户端请求到后端服务器的服务器选取计算方式,分别是取模法和一致性hash
4.3.1.1:map-base 取模法
map-based:取模法,基于服务器总权重的hash数组取模,该hash是静态的即不支持在线调整权重,不支持慢启动,其对后端服务器调度均衡,缺点是当服务器的总权重发生变化时,即有服务器上线或下线,都会因权重发生变化而导致调度结果整体改变。
所谓取模运算,就是计算两个数相除之后的余数,10%7=3,7%4=3,基于权重取模:(2^32-1)%(1+1+2)
listen web_port
    bind 10.0.0.102:80
    mode http
    #balance leastconn
    balance source
    server web2 10.0.0.104:80 weight 3 maxconn 1 check inter 2s fall 3 rise 5
    server web1 10.0.0.105:80 weight 1 maxconn 2 check inter 2s fall 3 rise 5
4.3.1.2 一致性hash
一致性哈希,该hash是动态的,支持在线调整权重,支持慢启动,有点在于当服务器的总权重发生变化时,对调度结果影响是局部的,不会引起大的变动,hash (o) mod n 。
listen web_port
    bind 10.0.0.102:80
    mode tcp
    #balance leastconn
    balance source
    hash-type consistent
    server web2 10.0.0.104:80 weight 3 maxconn 1 check inter 2s fall 3 rise 5
    server web1 10.0.0.105:80 weight 1 maxconn 2 check inter 2s fall 3 rise 5